This guide, Pinterest for Travel Bloggers, is designed for all levels of bloggers and pinners.
If you’re relatively new to travel blogging or to using Pinterest for Business, I recommend reading from top to bottom.
If, on the other hand, you’ve been at it for awhile and simply want to take your travel pinning to the next level, feel free to skip down to the section labeled Pin Like a BOSS.
While I typically don’t write content aimed at other travel bloggers, I wanted to share my knowledge on the topic as Pinterest consulting for travel brands has recently become my main source of income, and in my 2 years of experience working for clients with varying travel content and styles, I’ve learned a thing or two (or three or fifty).
It’s also something many travel bloggers have expressed frustration with, and with friends coming to me regularly for advice these days, it made sense to put it in one place for the sake of convenience.
Pinterest is an extremely powerful tool for growing your travel blog, and today I hope to convince you to allocate perhaps more time to Pinterest than any other social network.
Bold statement, I know, but let’s be real–we’re all frustrated with Facebook’s constantly changing algorithms and sure, Twitter is great for networking, but it takes a very special kind of person to figure out how to drive blog traffic from it (but if that special person happens to be you, please email me, I’m desperate).
Let’s get pinning, shall we?
The Power of Pinterest for Travel Bloggers – AKA Why You Need to be on Pinterest, Like, Yesterday
As of October 2015, Pinterest sees 100 million active monthly users; nearly 50% of those users reside in the US.
According to Pinterest, nearly 70% of people visiting the site are also taking action (saving pins or clicking through to websites).
People are increasingly using Pinterest as a search tool, just like they would use Google to search for information.
You don’t need a huge following to see huge traffic. With just over 1.3K followers, I’ve turned Pinterest into my number one traffic source and see thousands of referrals from the platform per month (with minimal effort!). I’ve achieved the same for clients with followings of all sizes.
You don’t need a lot of blog content. When done strategically, a few pins can go a long way. You don’t need thousands of articles to put Pinterest to work for your blog.
Using Pinterest doesn’t require any special skills. There are many free tools available to help you create beautiful graphics for Pinterest, and the platform is fairly intuitive to use.
It doesn’t require a huge weekly time commitment to begin to see significant growth.
But perhaps the most powerful thing of all…
Content on Pinterest has staying power. Unlike other platforms (*COUGH*TWITTER*COUGH*) the content you pin will be around and discoverable forever and ever. Especially if your pins become popular and accumulate thousands of repins, they will be shared and shared and shared to infinity and beyond.
And Pinterest’s growth shows no sign of slowing down–it’ll be worth your while to jump on board now and claim your own little slice of the Pinterest pie.
Types of Travel Content That Perform Well on Pinterest
- Packing Lists
- Packing Hacks
- Travel gear
- Travel Hacking
- Sample itineraries
- How to save up money for travel
- How to save money while traveling
- Destination-specific budget breakdowns
- Destination guides
- Anything related to solo female travel
- Travel statistics & infographics
- Listicles
- Travel photography
- Travel quotes
The Basics of Pinterest for Travel Bloggers
Consistency is key – Pin every day if possible. Spreading your pins out throughout the day is even better, but not 100% necessary, especially at first. No need to overdo it–between 20-30 pins per day is ideal.
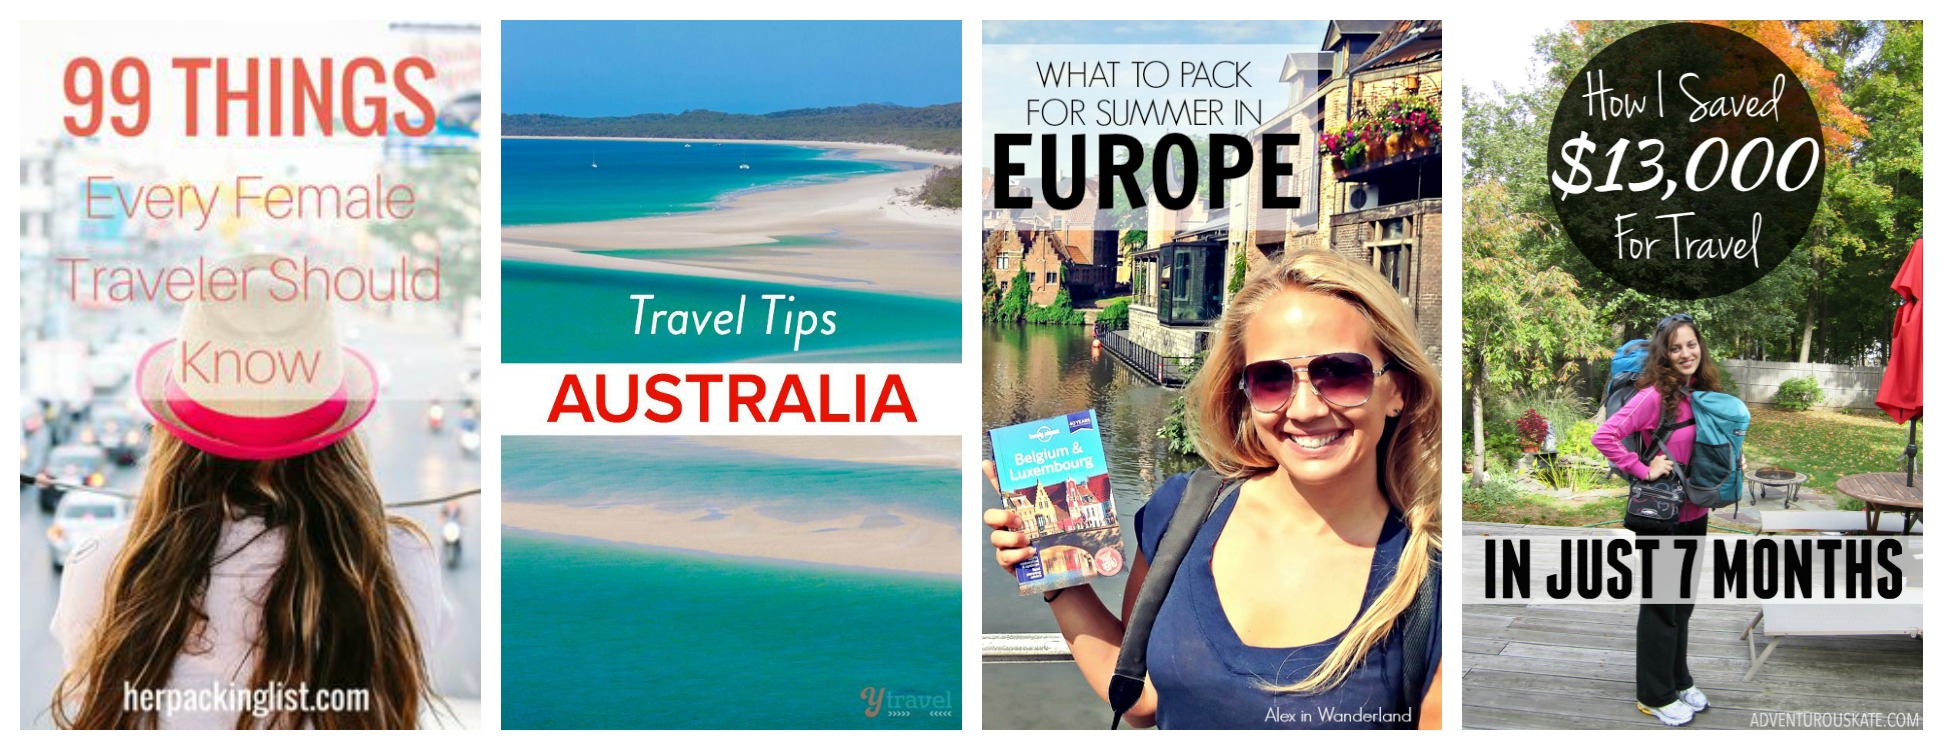
Use portrait-oriented images – Also sometimes referred to as “vertical images,” these are taller than they are wide. Don’t use those in your posts? Crop them.
Add text overlays – The pin should tell people what the article is about at a quick glance. Pretty images do well on their own, but images with text nearly always out-perform plain images in terms of converting to click-throughs.
Don’t forget the URL – You know, that thing that actually directs people back to your blog? When uploading new pins manually, you’ll have to edit the pin and add the URL to direct it back to the appropriate blog post. If a pin doesn’t link to anything, you will see “Uploaded by user” at the bottom left.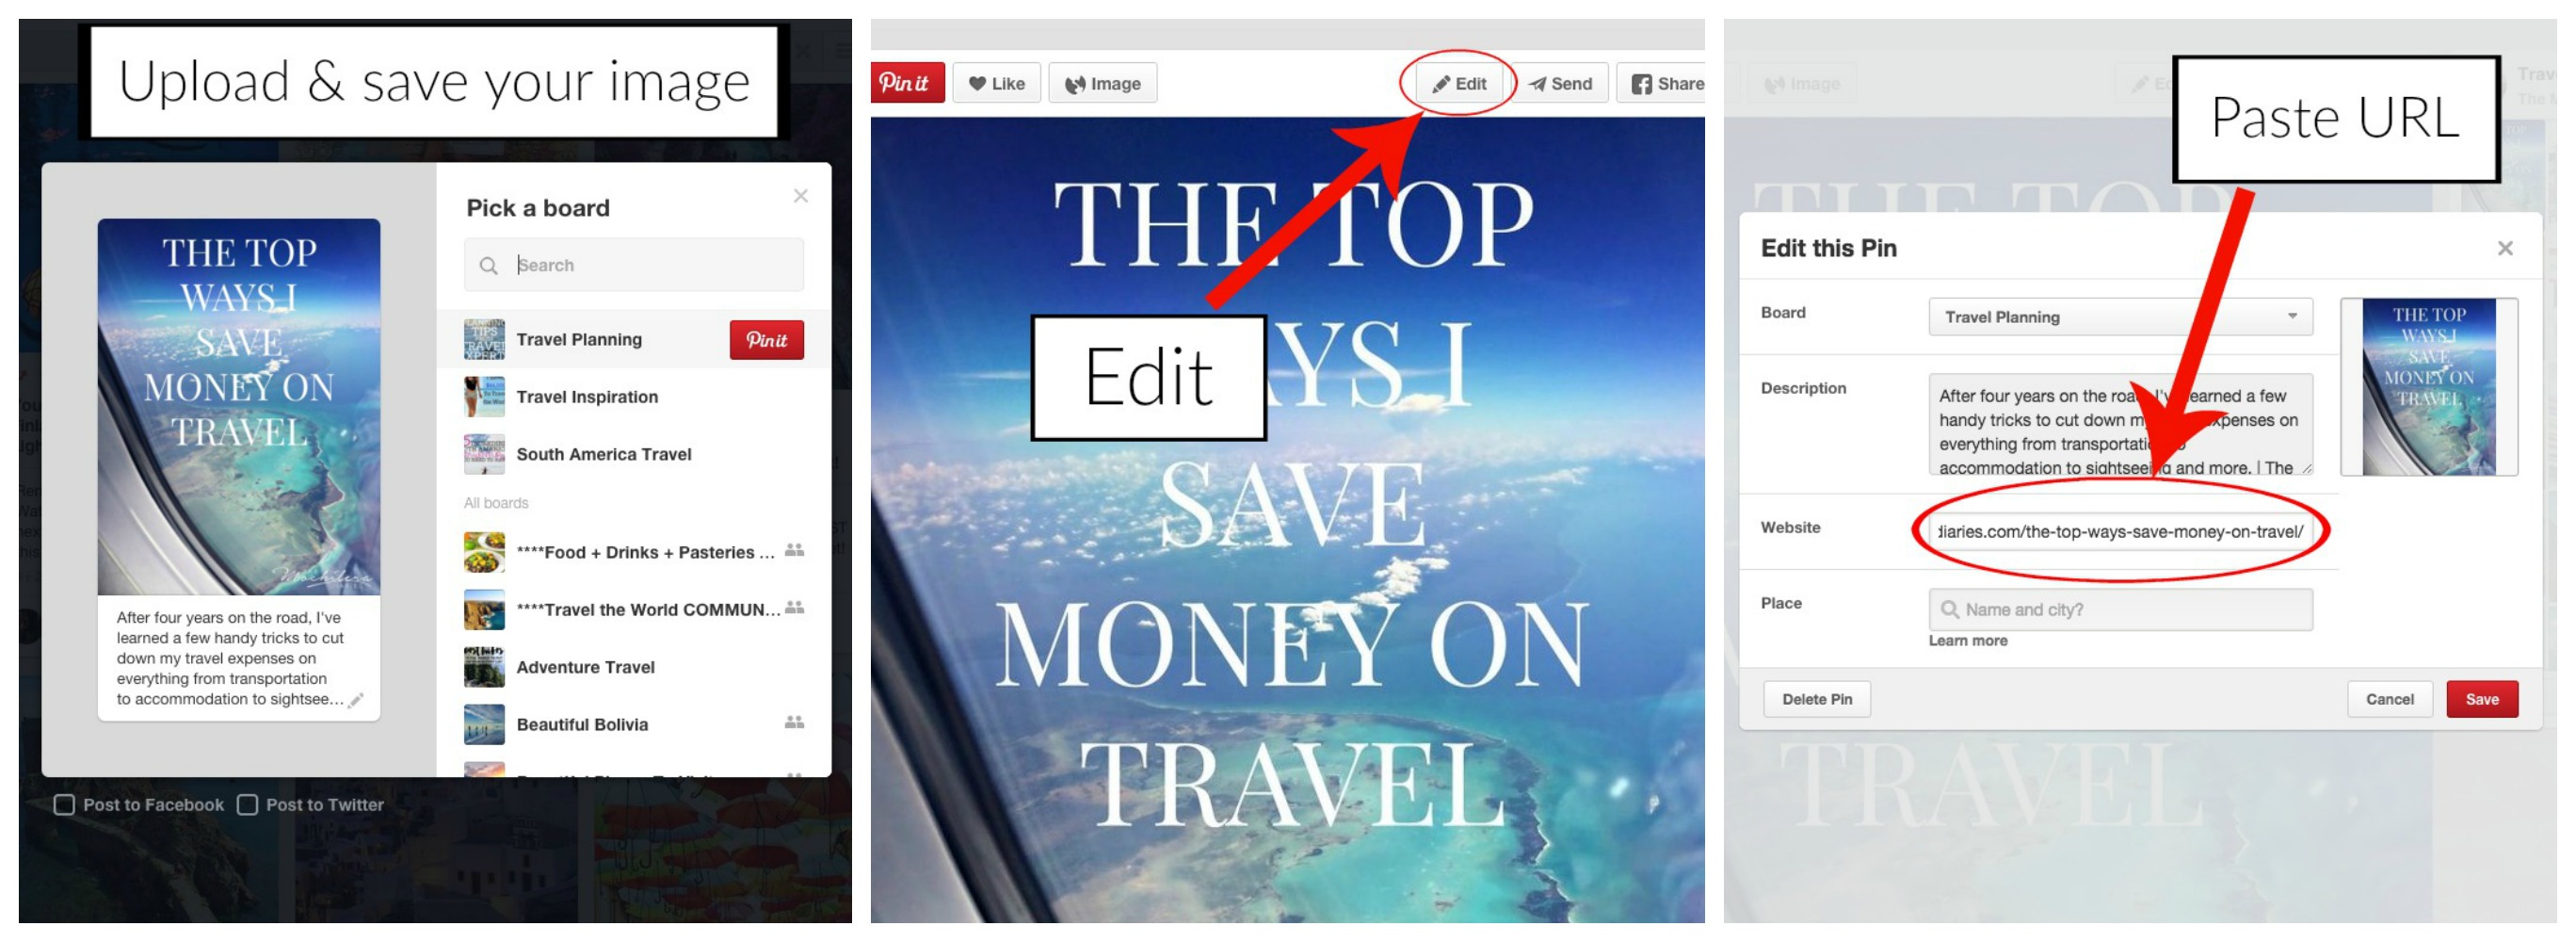
Don’t just pin your own content – Pin other people’s content more often than your own. Pinterest’s algorithms will reward you for your generosity (and your followers won’t think you’re an egomaniac; you might well be, but they don’t need to know that). Some sources suggest following an 80/20 rule.
Follow people that inspire you – Don’t be afraid to follow a crapload of people on Pinterest. I promise you, your credibility as an influencer will not suffer here. Besides, where else are you going to get great content? Searches are one way, of course, but following people who consistently pin high-quality content is a sure-fire way to find the Pinterest gold.
Here’s a list of influential travel bloggers on Pinterest I recommend you follow to get started:
- y Travel Blog
- Chasing the Donkey Croatia
- Her Packing List
- The Blonde Abroad
- Gary Arndt
- Alex in Wanderland
- The Planet D
- Beers & Beans
- travelFREAK
- Hecktic Travels
- The Sweetest Way
Go the Extra Mile
Convert to a business account – If you’re going to be using your Pinterest account to promote your travel blog (your business), you’re required to convert it from a personal account to a business account. Instead of pinning as Leah Davis, I now pin as The Sweetest Way. My website is connected to my Pinterest account and the URL appears in my profile. Full instructions for converting to a business account can be found here.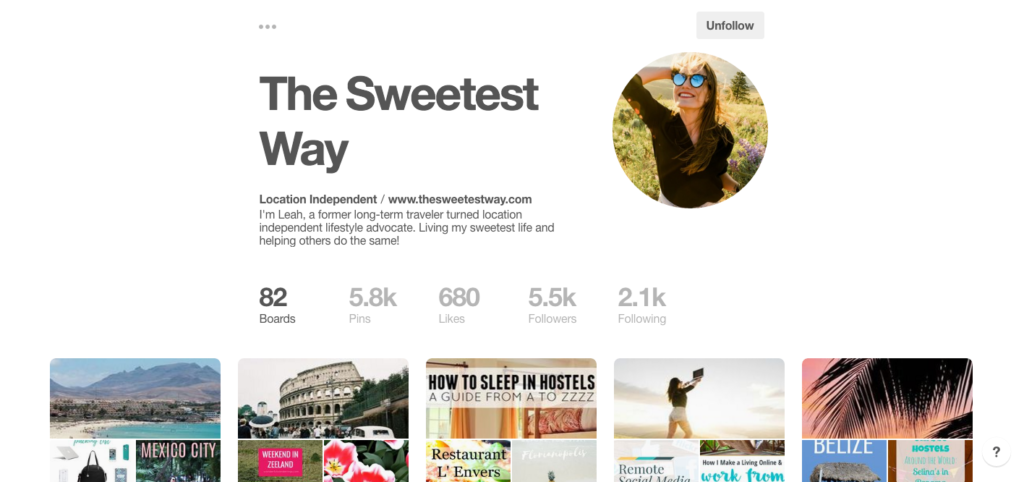
Apply for Article Rich Pins – Article Rich Pins are pins that show extra information in addition to the description you write in yourself, including your blog’s name and logo and the title of the article it links to. Not only are they are useful for branding your content and making your pins look more professional, but they help your pins appear more often in searches and feeds. They also tell people at a quick glance that the pin is legit and doesn’t link to spam.
Enabling Rich Pins requires adding a short snippet of code into one of your blog articles and submitting the URL to Pinterest for validation. Click here for instructions. If you use an SEO plugin like Yoast, be aware that the SEO title you give your article is the title that will appear on your Rich Pin. 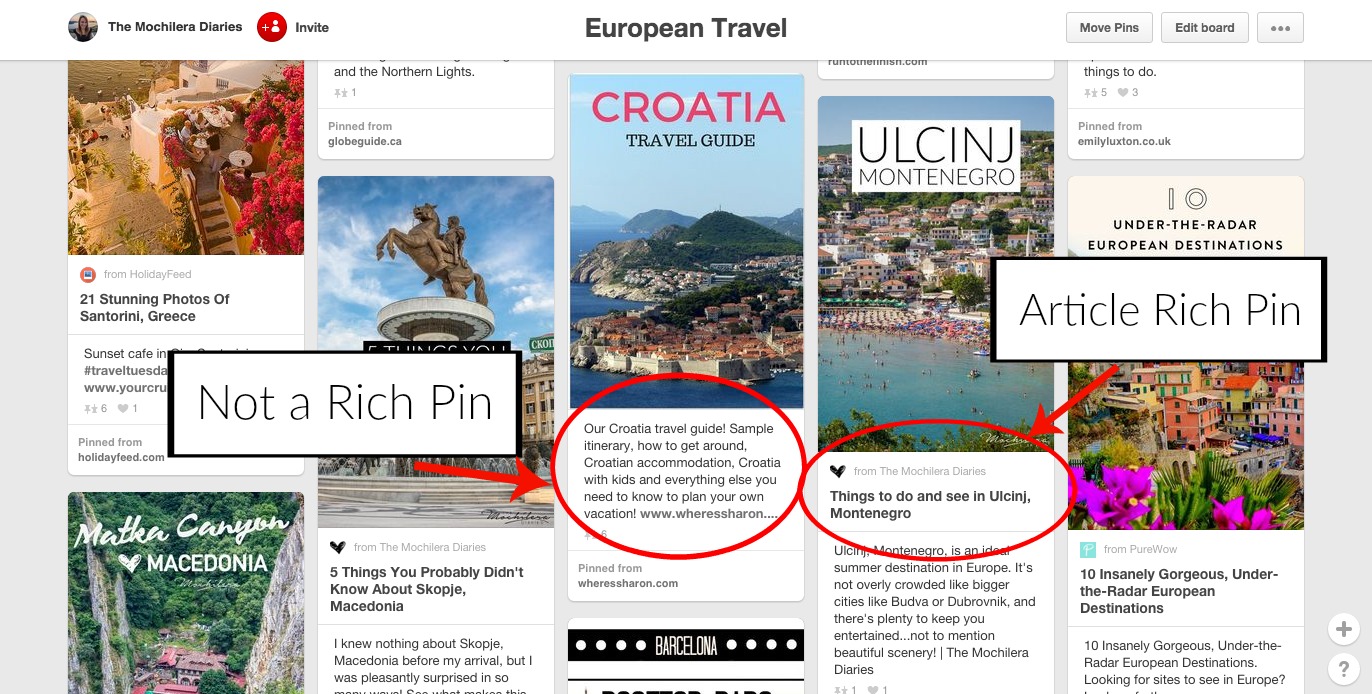
Organize your boards – Do this however you see fit, keeping in mind that the majority of people visiting your profile will only bother looking at the first 5 rows of your boards. Put the ones you want to garner the most attention close to the top.
Pin popular pins – You know those pins with 3209465 repins? You want some of those on your boards. Why? Because those popular pins will then show up in people’s searches and feeds, giving your account extra exposure. And when someone new pins that original pin (the one with 3209465 repins), Pinterest may suggest your board to that pinner as one they might enjoy, giving them yet another way to find (and follow) you. Finally, you already have the proof (3209465 repins) that these pins link to high-quality content, meaning your followers are likely to dig them as well.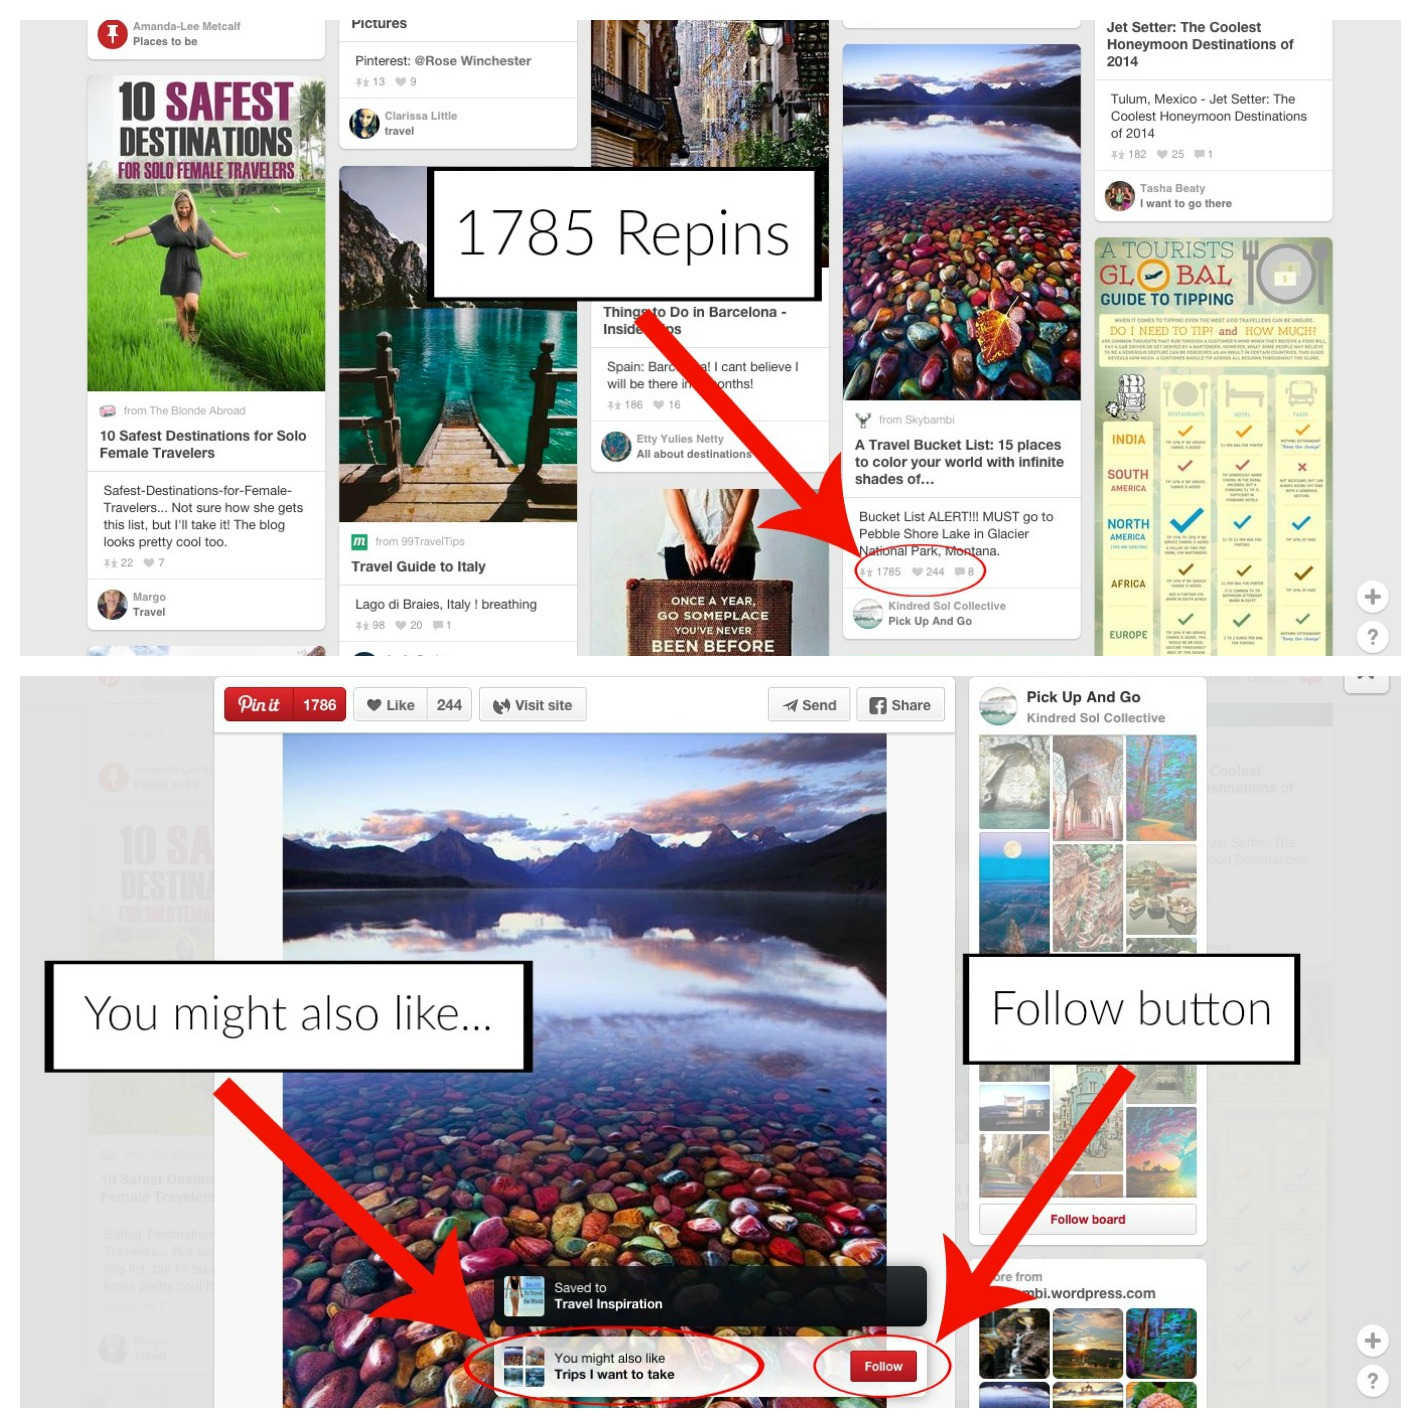
Comment on popular pins – The reason for this is simple–more exposure for your account.
Pin things you actually like – Yeah yeah, we’re travel bloggers and we should focus on creating and curating great travel content, right? Primarily, yes. But the benefit of having boards outside of your main niche is that you’ll become visible to people who you might not have reached otherwise. Have a passion for baking? Create a board all about cakes. Love DIY and interior design? Pin the projects that interest you.
Not only will this help you reach a larger audience and keep you from losing your mind (you don’t want pinning to feel like work, after all) it will keep your account looking and feeling more authentic and less like a travel content farm.
Join group boards – When you’re just starting out, one of the best ways to gain exposure is by finding and joining popular group boards that fit your niche. These boards can often have tens of thousands of followers looking for great content, so make pinning to these boards a daily priority.
Make sure you read and follow their pinning guidelines so you don’t get removed, and do NOT repeatedly pin the same image over and over (another good way to get banned). There are typically instructions for how to join group boards in the board description. If not, you can always try commenting on a pin or sending them a direct message to request an invitation. Not sure where to find group boards? Click here.
Use your analytics to pin strategically – The greatest benefit of a business account is that you have access to detailed analytics about your audience and their activity. If a certain type of pin continues to outperform others in repins and click-throughs, use this information to repeat that success with subsequent pins.
Find out where your audience is primarily based and pin for their time zone and at times when they are most likely to be active (typically in the evenings after 8 pm).
Pin Like a BOSS
Be a pin perfectionist – Because of Pinterest’s visual nature, high-quality pins are the key to your success. Do sloppy pins get repinned? Unfortunately for us all, they often do. But sloppy pins are a waste of potential. I’ve personally been known to pass by many a pin, even knowing that it probably linked to quality content, purely because I didn’t want an ugly eyesore on my board.
If photography is not your strong suit or you only shoot with an iPhone, you might be better off using stock images, because Pinterest is one place where low-res and low-quality photography just does not cut it.
To quickly and easily create beautiful Pinterest graphics, I prefer PicMonkey. The free version works just fine and can even be used for basic editing if you don’t have editing software like Adobe Lightroom, but the paid version (PicMonkey Royale, which costs just $33 per year) gives you access to tons of added options including premium fonts and advanced functions like airbrushing, filters, effects and overlays, and more. It also allows you to use the fonts you already own; I’m constantly adding new fonts to my repertoire, which I download for free on sites like Font Squirrel.
Another excellent resource for creating pins is Canva. I find it slightly less user-friendly, but it does have a number of free design templates that make creating nice looking pins quick and painless. To make your pins stand out from the crowd (since most people use the free elements only) don’t be afraid to spend a dollar here and there for the premium stuff.
Aspect ratios between 2:3 and 4:5 get repinned 60% more than extremely tall pins. 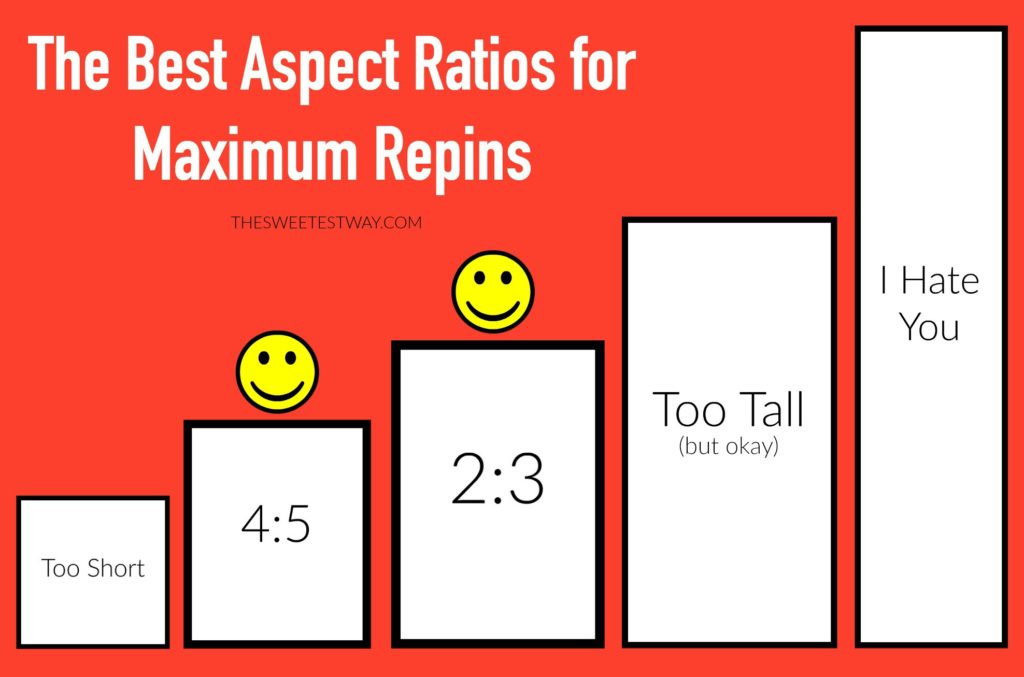
Use primary colors in your images. Pins with more reddish tones get repinned more often than blues. Brighter images get repinned more often than extremely dark ones.
Don’t be afraid to create multiple pins for the same post. Make a pin for every image in the post if you want! Experiment with the design and even change the text to see what works best. The text on your pin doesn’t have to match the title of your post–just make sure it’s not misleading.
Stay true to your brand – This applies to everything from your pin design to your board titles to your comments on other people’s pins. A few examples of how to brand your Pinterest account from top to bottom:
- Put your logo or URL on all the pins you create
- Use your own photography whenever possible
- Create boards that cover all the topics you blog about or things that fit your personality – I have a board all about wine, for example, and another one all about maps, (I don’t even blog about maps I just really, really love them)
- Create a board for your blog’s best content – Place it in the top row of your profile so people visiting can find your good stuff quickly and easily
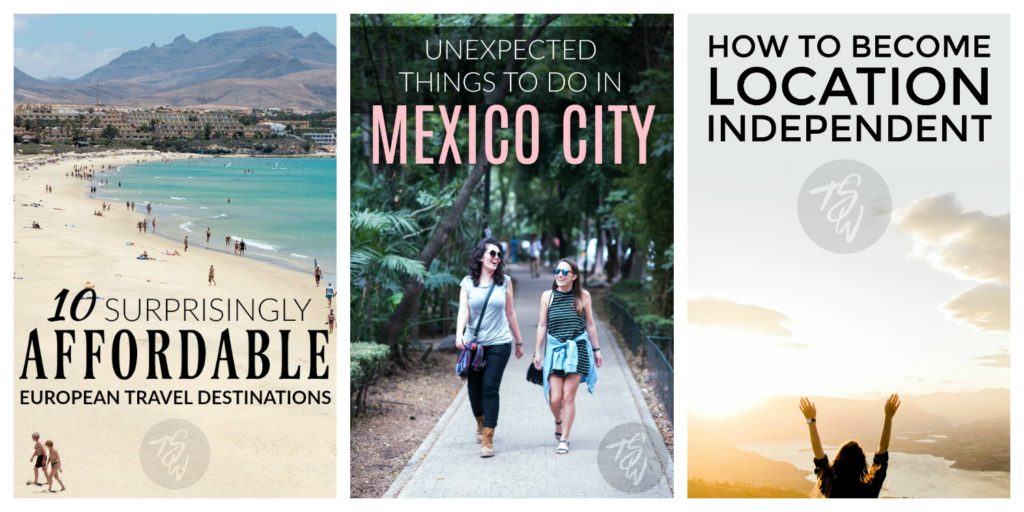
My logo always appears (subtly) on my pins. I stick to clean fonts and use no more than two different colors for my text.
Check out Anglo-Italian Follow Us, Bacon is Magic, and No Money, Will Travel for examples of beautifully branded pins.
Don’t forget keywords – You want your pins to be easy to find in searches, so you need to use relevant keywords in your pin descriptions, image titles, and alt descriptions on your blog. When saving my pins, I make sure to give it a descriptive title; for example, instead of saving a pin as “airplane window” I might rename it “Saving Money on Travel.” When an image is pinned directly from your website, the text that shows up as the default pin description is that image’s alt text. If you’re not already giving your images keyword-rich alt descriptions, start doing so now, especially if you’re adding your pinnable images directly into your posts (which I’ll get to in a minute).
Use a call to action – Whether it’s on the pin itself or in the pin description, invite people to “Click to read!” or “Find out more!” or whatever you want the pinner to do. Pins with a strong call to action generate up to 80% more engagement than pins without.
Create your own group board – Gain followers and reach a new audience by inviting other people to pin to your boards. Just make sure to invite only pinners you know and trust to pin high-quality content.
Don’t waste your time pinning to crappy group boards – This is going to sound harsh, but some group boards out there suck a big fat one. I mean they really, truly suck. They may have 55K followers, but if Pinterest doesn’t think the content there is any good, no one’s going to see it–not even the 55K people who chose to follow that board. You can spot one of these boards by doing a quick scan–do most of the pins have 1 repin or no repins at all? That means no one is seeing them, and your time is better spent pinning elsewhere.
Make it easy for people to pin directly from your website – Install a social sharing plugin that includes Pinterest or a plugin that causes a “Pin It” button to appear whenever someone hovers over the images in your post (I use both). Because I want people to pin a specific image (the vertical image with text that I’ve created) I like to add this image to the end of my post with a call to action to make it obvious and as simple as possible for readers to find. Others use it as their featured image so it’s the first one the reader sees. Whatever works!
Pin It!
Schedule your pins using a third-party app – If you don’t want to have to worry about being on Pinterest every single day, it is worth the small investment to use a scheduling app.
Tailwind is what I use, and I genuinely can’t recommend it enough. Pins are scheduled based on when YOUR audience is most active, to guarantee you the best possible engagement. Pins can be scheduled quickly and easily using the browser extension, and they can be scheduled to multiple boards at the same time (and pinned at intervals that you choose). Finally, you get access to detailed analytics like follower growth and repin data, not to mention feedback on pin design, profile completion and more.
Pinterest Faux-Pas to Avoid at All Costs
- Linking to an article with a misleading image – With a few exceptions, it’s best to use an image that’s actually in your post to create a pin; otherwise, users might see this as deceitful. If the post has no images that would work well as a pin or contains no images at all, my suggestion is to use a stock image that at least relates to the topic of the post.
- Pinning the same pin to 80 different boards at the same time.
- Repinning something and leaving the description blank.
- Stuffing your description with hashtags – Hashtags were reintroduced on Pinterest in the last year, but there’s no need to go overboard. I’ve been using 2-3 relevant hashtags in each pin description and this seems to be sufficient for now.
- Using other people’s images to link to your own content – NO NO NO NO NO. NEVER EVER.
The Jury’s Still Out…
I have yet to see conclusive evidence on what the best practices are regarding the following:
Branded board covers – I’ll be the first to admit, beautifully designed and on-brand board covers can make a profile look legit and well-organized. Whether they actually influence people’s decision to follow you is up for debate. If you have the time, go for it, but in the beginning, it’s probably not your highest priority.
Place Pins and maps – As stated earlier, Article Rich Pins are my preference over Place Pins because I prefer people know what my article is about so they click through to read it. Another thing that irks me about Place Pins is that the source is listed as Foursquare, not your blog. I personally have never used the map function as I find it a bit awkward and clunky, but then again I’m typically finding travel inspiration on Pinterest (i.e. researching), not actually using it for travel planning. This is not to say that my way is the right way; if anyone out there has data supporting one type of Rich Pin over the other, I’d love to see it.
The ideal number of boards – I’ve seen accounts with as few boards as 5 and as many as 300. One advantage I can see to having many boards is that you may be able to repurpose old content–in other words, cross-pin it to another applicable board at some point after the initial pin (if you have a pin about Barcelona, for instance, and boards about both Europe and Spain). This can breathe new life into your old content and give people a second chance to repin it.
Finally…
Give it time – Pinterest growth, as with all things blogging-related, takes a considerable amount of time. Don’t beat yourself up if you don’t see results right off the bat, especially if you’re building up a profile from scratch. It takes many days and weeks of pinning consistently and pinning high-quality content for you to get in Pinterest’s good graces. Furthermore, the average half-life of a pin is 3.5 months. That means a pin will only have seen about half its engagement after that period of time. Sometimes a pin will begin to pick up momentum months after originally being pinned.
Also, remember that repins will not always equate to blog traffic right away. Plenty of people pin articles that they want to read later, and then of course there are people like me (account managers) who don’t have the time to read even half of the content they’re pinning (although it’s good practice to make sure the link works and at least give it a quick scan). Repins do matter because you want your content disseminated as far and wide as possible, but be patient with those repins converting into real traffic.
Ready to take your Pinterest game to the next level? I’m creating my very own Pinterest course this year, and I want you to be the first to know about it. Join my mailing list to get all the updates and to find out when it’s launching.
As a travel blogger, using Pinterest is an absolutely essential part of a good social media strategy. Still thirsty for more Pinterest tactics and advice tailored to your brand? Schedule a one-on-one consultation with me.
Sources of Pinterest statistics: here and here.
*This post contains affiliate links. I may receive a small commission if you make a purchase after clicking on them, at no extra cost to you.

